Edited for clarity and because I must have typed the first version with my elbows...All right.
< stream of consciousness >
Material-wise, linen ftw. Last summer's camp ended up with cotton tents (although they were supposed be water-proof) molding in the spot after a few days of rain. They were faulty tents anyway, but still. There is a Viking / Iron Age encampment held every year in Åland, and last summer they managed to get hit by a rainstorm of the decade - the entire summer's worth of rain came down in couple of days. My friend's linen tent only leaked when the water level rose so high it came in from under the tent.
(That same friend co-owns a proper Viking-style longship. I must wheedle my way in for a ride some day.)
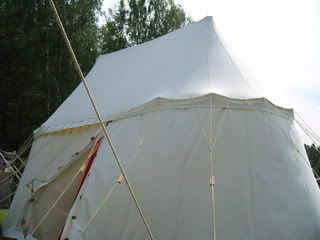
The simple cartwheel tent consists of one center pole, the spokes of the wheel about two thirds up the center pole, the conical roof, the wall fabric (in two pieces, usually), and ropes to tighten the tent. A minimum of wood is required. A tent this big (seriously, we called it Mt. Fujimori, it's almost as big as my apartment, certainly higher)
packs up like this:
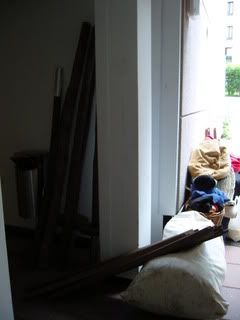
The body bag has all of the canvas in it. This tent has two poles (in two halves), and they are leaning against the wall and the smaller cartwheel spokes are against the bag.
For the reference of the size, and the evidence why it is such a good idea to have the tent lined, at least if you venture into enemy territory:
The lumpy thing in front of the tent is me but in my defence I must say that I'm wearing quite a many layers of clothing.

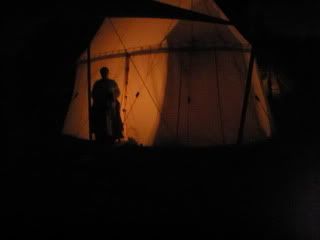
As mentioned, the tent is easy to assemble, and the one-pole variety only requires two people.
1) You start by joning the two halves of the center pole together (there's a peg and a hole as in the upper half of the pole has a wide metal ring in which the lower half goes), slide the metal spike on the other end through the hole in the middle of the roof fabric and lift it up.
Depending on the ground it might be a good idea either to dig a small hole for the pole, or make it stand on a piece of wood or a flat stone.
One person holds the pole straight and the other curses at the tangled ropes and tries to get them attached to the ground in an even circle. After the ropes are somewhat tight, the pole pretty much stands up on its own.
2) Then it's the turn for the cartwheel spokes. The center piece of the cartwheel is attached to the center pole. On one end the spokes have pegs which attach to the holes in the wheel, the other end rests in canvas pockets sown in the edge of the roof. What you have now resembles a gigantic umbrella.
The weight of the tent rests on the central pole, and the roof canvas ad the ropes are the ones holding it up. It can be well used just as a canopy without the walls, or with just some of the walls attached.
3) Now the wall fabric can be attached to the roof (the roof has wooden pegs, the wall loops). Tighten the roof ropes and the ones on the bottom of the wall and ta da! You have yourself a tent.
Mt. Fujimori took five or six of us to assemble.
The cartwheel spokes are handy if you want to divide space in the tent, or hang clothes / lanterns / mosquito nets / what have you.
On
this site here are plenty of pictures of medieval manuscripts depicting tents, and their modern reproductions.
As for pictures of furniture,
this here store carries all sorts of drool-worthy and collapsible stuff.
< / stream of consciousness >
Did it make any sense at all?
Here, I made this:
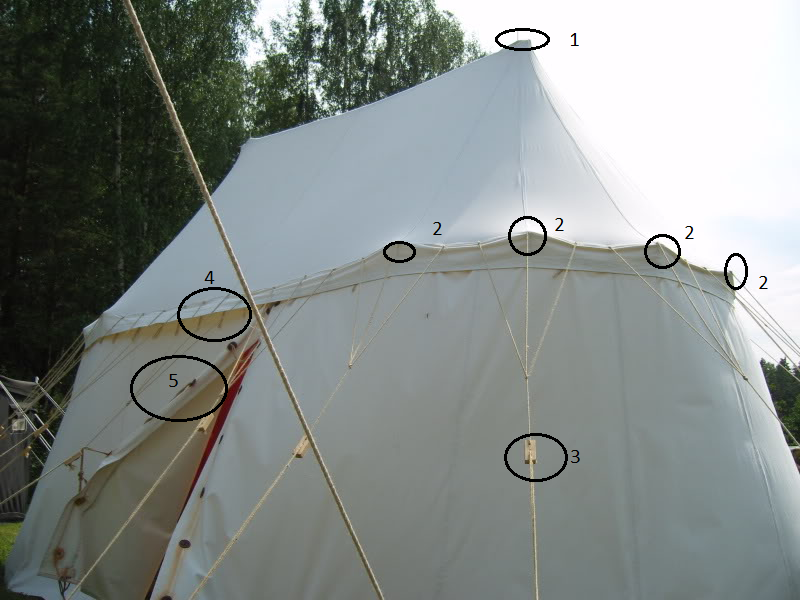
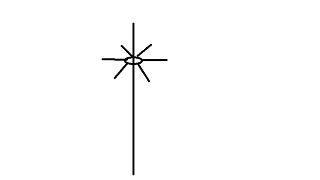
1) the metal spike at the end of the central pole. If your character has a banner, this is where it goes, and it is the third thing you do when pitching a tent.
2) The ends of the spokes.
3) These things are used to tighten the ropes.
4) Look closely and you see bits of rope hanging from under the roof. These are part of the loops with which the walls are attached to the roof canvas. The roof has wooden pegs, the walls rope loops. Important - if it rains the ropes will soak up a lot of water and if the ends hang on the inside of the tent your character will have his or her stuff nicely moistened.
5) How to close the door or attach the wall bits to each other: The other side has loops, the other holes. Slide the loops through their respective holes, and then the uppermost loop through the loop under it and that loop through the one under it and so forth all the way down.